
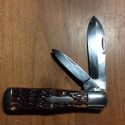
As my first knife rehab went ok. I decided to do another one. This too is a Camillus CampKnife. I got this for free. You can see why.
I will be trying to make jig boned handles this time around.
As found. As you might be able to see in the first picture. The main Blade is laying on the wrong side of the punch.
After taking apart I found the main blade tang bent. I few carefully placed blows and it is good to go.
Go #2
Re: Go #2
Here are some pictures of it all apart. I soaked all components in Vinager for 45 minutes to remove the rust.
After removing and neutralizing everything I cleaned them all up. Also the bone for the handles.
I only removed the rust then buffed lightly the blades.
After removing and neutralizing everything I cleaned them all up. Also the bone for the handles.
I only removed the rust then buffed lightly the blades.
- Attachments
-
-
-
-
-
-


Re: Go #2
Looking good so far. 
Can't wait to see what it looks like when you're done!
Can't wait to see what it looks like when you're done!
Dale
AAPK Administrator
Please visit my AAPK store: www.allaboutpocketknives.com/orvet
Job 13:15
"Buy more ammo!" - Johnnie Fain
“Evil is Powerless If The Good are Unafraid.” – Ronald Reagan
AAPK Administrator
Please visit my AAPK store: www.allaboutpocketknives.com/orvet
Job 13:15
"Buy more ammo!" - Johnnie Fain
“Evil is Powerless If The Good are Unafraid.” – Ronald Reagan


Re: Go #2
Today I cut the bone out, jigged and stained. I used dark brown Rit dye.
First thing I did was slice the bones to get 2 slabs slightly under 1/4”. I then ground the back side of the scales flat. I then Made one length side flat and square to bottom. Then flipped around to make the scales parallel. I then proceeded to make them to length.
The fit between the bolsters nice and snug no gaps. I then used a 1/8” ball bit on my dremel and tried Jigging. I then set up my camp stove and placed the scales in a small coffee can with about 1-1/2” of water and brought to a simmer. I held it there for 15 minutes and added the dye. I allowed that to simmer for an additional 15 minutes. Removed and am now going to let them dry for a day or two.
Next weekend mount the scales to the liners and assemble and finish.
- Attachments
-
-
-
-
-
-
Re: Go #2
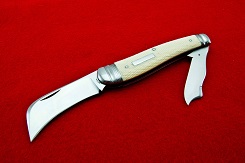
All done. The major things I learned. Buy the scale blanks. Cutting your own is too time consuming. Dying the bone did not work that great. No real penatration. If I do make scales. Make them much thinner.
Positives. With a bit of time and elbow grease one can save a pretty crappy knife. Then turn it into a fair To good knife.
I will continue to rehab knives. It is great fun.
Positives. With a bit of time and elbow grease one can save a pretty crappy knife. Then turn it into a fair To good knife.
I will continue to rehab knives. It is great fun.
- Attachments
-
-
-
-
-
bladebuddy
- Posts: 274
- Joined: Mon Mar 11, 2013 11:56 pm
- Location: Elmira NY
Re: Go #2
TWhite thanks so much for the detailed pictures of your repair job. You took a piece of scrap metal and turned it into a good looking usable knife. I really like your jigging work on your home made scales. Steve B.
Steve B.
Keep your edge sharp, otherwise you just can't cut it.
Looking for Carrier Cutlery and early Robeson with Elmira tang stamps.
Keep your edge sharp, otherwise you just can't cut it.
Looking for Carrier Cutlery and early Robeson with Elmira tang stamps.


Re: Go #2
It looks super! I actually like the white bone showing on the edges and ends. It makes it look more like stag. And GREAT work on that jigging!
Jesus is life.
Everything else is just a hobby.
~Reverand
Everything else is just a hobby.
~Reverand
Re: Go #2
Your jigging is pretty good.
I buy roosters combs and farmers..........................................................jack knives [/b]
GEC SFOs and others at LICK CREEK CUTLERY- www.allaboutpocketknives.com/wlf
May the Father and Son bless
Lyle
GEC SFOs and others at LICK CREEK CUTLERY- www.allaboutpocketknives.com/wlf
May the Father and Son bless
Lyle
