Fixed blade Tutorial

This forum is for posting step by step techniques used in the art of making, customizing, and repairing knives. Please stop by and teach a few things or maybe learn something new from the talented members of AAPK.
knifemaker3
Posts: 582
Joined: Tue Nov 25, 2008 10:56 pm
Location: Southern Missouri
Contact:

Re: Fixed blade Tutorial

Post by knifemaker3 »

Sorry to all who have been watching this thread. I haven't had much time to work on this knife due to chiropractor appointments, cold weather, and added work on the farm. ::dang:: ::dang:: ::dang::

Hopefully I'll get to work some more on it next week. :oops:

Thanks.
God Bless!

Craig Blankenship
Booger County Outfitters LLC.

Maker of Custom Knives and Custom Screenprinted Garments
User avatar
gmusic
Posts: 3145
Joined: Tue Oct 04, 2005 7:27 pm
Location: Piute Mountains.
Contact:

Re: Fixed blade Tutorial

Post by gmusic »

No problem Craig................................

Thanks for the tutorial.
http://www.musicmadeknives.com

Rodger, (Rodger-50/2050), Bill (El Lobo), Johnny Fain (jonet143), Johnny Samples (Johnnyrotten),
Bill Price (CCBill)


Please feel free to contact any mod or admin with concerns.
knifemaker3
Posts: 582
Joined: Tue Nov 25, 2008 10:56 pm
Location: Southern Missouri
Contact:

Re: Fixed blade Tutorial

Post by knifemaker3 »

Made it to the shop today again!

Ok, after the 1 handle drys, I unclamp, drill all the holes, and attach the second side using the same procedure as above. After it has dried, I drill all the holes, and take it to the bandsaw and rough cut it out to the shape of the handle. Here is what it looks like:
100-0002_IMG_5.JPG
100-0002_IMG_5.JPG (65.04 KiB) Viewed 14430 times
Closer look:
100-0003_IMG_4.JPG
100-0003_IMG_4.JPG (65.59 KiB) Viewed 14430 times
Next, I carefully sand to shape making sure not to get the handle too hot. If the handle gets too hot at this point, the epoxy will soften and the handle material will pop up. When that happens, I drench the crack between the handle and tang of the knife with superglue and reclamp until dry.

Here is the knife sanded to shape:
100-0004_IMG_3.JPG
100-0004_IMG_3.JPG (73.39 KiB) Viewed 14429 times
Next, I set the pins. I do this by cutting the 1/8" brass pins material so that I have between 1/16"-1/8" sticking out on both sides of the handle material. Next, I chamfer all holes with a 60 degree countersink bit in the drill press. I also countersink the thong hole as well even though I'm not going to be installing a tube.
100-0005_IMG_3.JPG
100-0005_IMG_3.JPG (66.13 KiB) Viewed 14431 times
Next, I slightly round the ends of the pins on the sander. Then, I insert a pin and very carefully start peaning it. On the first hammer strike, I make sure I have the pin sticking out enough on the bottom side to have enough to pean. Then, I hit it medium hard strike with the flat side of my ball pein hammer. Then I flip and repeat making sure to not hit so hard as to crack the handle material. Then, I start using the round side of the hammer and start lightly peaning the end of the pin. I usually do about 5 blows, flip and do 5, flip and so on. I keep doing this until the countersunk holes are filled. It takes practice to do this and not crack the handle material. I just go slow and watch and use very light blows after the initial taps.
God Bless!

Craig Blankenship
Booger County Outfitters LLC.

Maker of Custom Knives and Custom Screenprinted Garments
knifemaker3
Posts: 582
Joined: Tue Nov 25, 2008 10:56 pm
Location: Southern Missouri
Contact:

Re: Fixed blade Tutorial

Post by knifemaker3 »

Next, I go back to the sander and finish sand the handle. On this particular knife, I am going with a more flater profile so I just use the platen to do most of the work around the tang area of the knife. I start using 220 grit, then 320, and finally 400grit. Then, I work on the sides of the handle starting and finishing with the same grits. I slightly round the edges of the handle with 400 grit to knock the sharp edges off.

When I want a more round profile on the handles, I use a slack belt and hand finish with strips of old sanding belts and hand sand.

After the handle is finished sanded, I start getting ready to buff the knife. I will just buff to a satin finish. If I was mirror polishing, I would still start with a satin finish. I put a satin finishing buff on the Grizzly grinder. Here I am ready to start:
100-0006_IMG_4.JPG
I buff both sides of the blade. NOTE: BUFF ONLY THE LOWER 1/2 OF ANYTHING YOU ARE BUFFING. THIS IS THE MOST DANGEROUS PART OF KNIFEMAKING. BE VERY CAREFULL. WEAR LEATHER GLOVES AND KEEP YOUR MIND ON WHAT YOU ARE DOING!

Next, I switch to a sewn muslin buff charged with fabulustre compound to buff the spine, tang, handle, and bolster areas.
100-0007_IMG_3.JPG
Then I buff these areas. Here is the almost finished knife!
100-0008_IMG_3.JPG
100-0008_IMG_3.JPG (61.76 KiB) Viewed 14430 times
God Bless!

Craig Blankenship
Booger County Outfitters LLC.

Maker of Custom Knives and Custom Screenprinted Garments
knifemaker3
Posts: 582
Joined: Tue Nov 25, 2008 10:56 pm
Location: Southern Missouri
Contact:

Re: Fixed blade Tutorial

Post by knifemaker3 »

IT"S TIME TO SHARPEN THE KNIFE!!!! ::nod::

I sharpen by starting on the sander using a worn 400 grit belt. Once I see the burr show on the edge, I buff off the burr. Then, I usually hand sharpen on a diamond hone to better refine the edge. I usually get it sharp enough to shave hair off your arm and slice through newspaper. Anything more is not needed in my opinion. One thing I've noticed about stainless steels, I just can't get that same scary sharp edge I can with carbon steel blades sharpened the exact same way. I think it has to do with the molecular makeup of the steel. I just know stainless is harder to sharpen than carbon.

After it's sharpened, it's time to mark my logo on the knife. I used to sale under the name of Blankenship Knives, but since adding screenprinting to my business, I have since changed my business name to Booger County Outfitters LLC. I use 2 seperated marks, one with a banner and the business name inside the banner, and the other a circle with BCO inside the circle. On this knife I will use the circle mark.

Here I have everything laid out to make the mark. I use an etchomatic etcher and stencils bought from Ernie Grospitch. These are great stencils and if anyone is interested, I'm sure he won't mind me refering you to him. Just give me a pm and I'll shoot you his web address.
100-0009_IMG_3.JPG
The finished mark:
100-0011_IMG_3.JPG
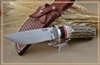
And here is the finished knife.
100-0012_IMG_3.JPG
I still need to make a sheath for this, but will not be including the sheath production in the tutorial. I will be making a leather sheath for this knife.

I have really enjoyed making this tutorial for you all to see here on AAPK. I really want to thank Bryan for the opportunity to do this. It's been a pleasure.

To whomever wins this knife when it is given away, I hope you enjoy using this knife for many years to come.

Thanks all for letting me do this. This is a great community and I just wanted to be able to give back in some fashion.
God Bless!

Craig Blankenship
Booger County Outfitters LLC.

Maker of Custom Knives and Custom Screenprinted Garments
User avatar
gmusic
Posts: 3145
Joined: Tue Oct 04, 2005 7:27 pm
Location: Piute Mountains.
Contact:

Re: Fixed blade Tutorial

Post by gmusic »

Very nice Craig!

I like the Wharncliff blade, and the small notch at the plunge line. I put that same notch on my kitchen knives so you can sharpen them all the way down.

Thanks again for the great tutorial...................................!!
http://www.musicmadeknives.com

Rodger, (Rodger-50/2050), Bill (El Lobo), Johnny Fain (jonet143), Johnny Samples (Johnnyrotten),
Bill Price (CCBill)


Please feel free to contact any mod or admin with concerns.
User avatar
jonet143
Gold Tier
Gold Tier
Posts: 6922
Joined: Fri Jun 23, 2006 3:33 am
Location: w'ford-tejas

Re: Fixed blade Tutorial

Post by jonet143 »

::tu:: ::tu:: ::tu:: thanks for sharing this adventure!
johnnie f 1949

on the cutting edge is sometimes not the place to be.
please support our troops - past and present
if not a member...join the NKCA! they're on our side.
User avatar
just in case
Posts: 361
Joined: Sat Jul 17, 2010 1:17 am
Location: Georgia

Re: Fixed blade Tutorial

Post by just in case »

::hmm:: Thanks Craig.
"Aint no fun when tha Rabit got tha Gun. "
Post Reply

Return to “Knife Related Tutorials”