Page 3 of 20
Re: Shops, tools, materials and tips
Posted: Sat Jan 03, 2009 6:18 pm
by orvet
Great look at your shop Brent! You got lots of cool stuff. I like the old machines, I just don't have enough room for them in my shop. As it is I have to keep my gas welder, wood lathe & metal band saw stored in another building, along with my big anvil.
I am glad you brought up this thread again. I see I promised CCBill more pics of my shop, & since I have it about half cleaned (for the new year) I will have to take some pics when I finish cleaning it.
Dale
Re: Shops, tools, materials and tips
Posted: Sat Jan 03, 2009 8:33 pm
by CCBill
Wow, Brent.
Thanks for a look into your world. I, too, love the old machines. That 2,000 lb, DeWalt drill press would probably only weigh 80 lbs, today with all the plastic and mystery metals they use on them now.
I I ever get my shop cleaned up, I will take some more pics of it. That is my Winter project.
Dale, looking forward to an update on yours.
Anybody else? Aw, come on...
...CCBill...

.
Re: Shops, tools, materials and tips
Posted: Fri Jan 09, 2009 10:11 pm
by justold52
Brent I to love looking and a mans work shop.
It tells me a lot about the man and what he does.
Thank you so much for showing yours.
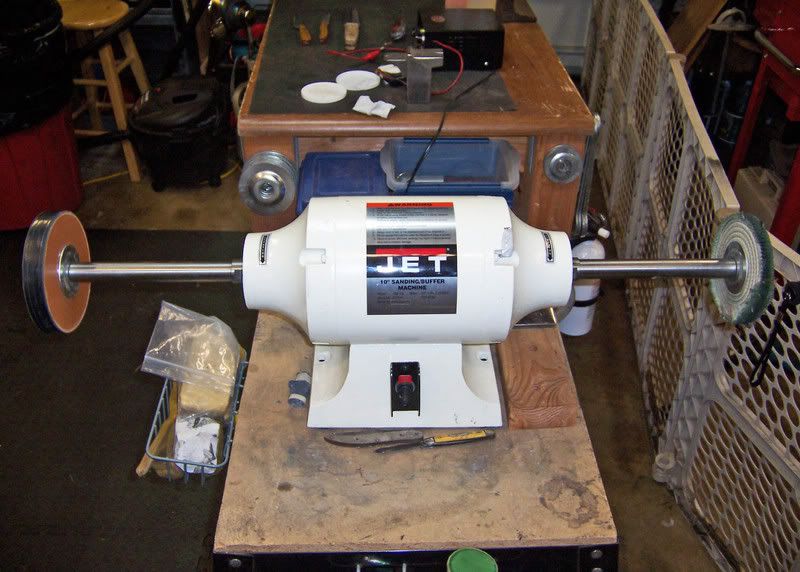
I like your belt sander. Did you make it work with that motor?
I have an idea for you if you did.
Keep an eye out for a tred mill in the trash.
Take it home and use the motor and the speed controler.
That way you can slow it down or speed it up...

Re: Shops, tools, materials and tips
Posted: Sat Jan 10, 2009 1:15 am
by Brent
That is what i did. i took the motor and mounted it and the electronics on a board. attached the sander and set the controls in front of the box that houses the electronics. I can go from a crawl to pretty fast. It works great for free, but the Kalamazoo wasn't free. Brent
Re: Shops, tools, materials and tips
Posted: Sat Jan 10, 2009 5:09 pm
by orvet
I promised CCBill I would put some new shop pics on here.
I finally got the shop rearranged & some of the things I don’t use a lot moved to another area so I could actually move around in my shop.
My shop started out as a two-car garage. This past summer we put a wall across the north end of the garage to form a laundry room and pantry. The shortened my garage by about 8 feet. My shop is in what is left of the garage.
If you were to open the garage door and looked in my shop you are facing generally to the north.
This is facing the North wall where I have peg board to hang tools and beneath it are drawers for storage and a workbench.
[img]https://www.allaboutpocketknives.c ... .jpg[/img]
In the northeast corner is a workbench or I do file work and other detail type work. Notice there is a Foredom on either side of the bench. Shelving to the right of the bench has knives I am working on in little plastic trays. Also there are parts cabinets on the wall that contains small tool, burrs, drills bits, punches, and a variety of other small tools. Note the Imperial cabinet -- not Imperial knives, but Imperial brass fittings. This cabinet came from one of the service stations my dad used to own.
[img]https://www.allaboutpocketknives.c ... .jpg[/img]
Continuing down the east wall is shelving where I have knife parts arranged in little parts cabinets, fishing tackle trays, and anything else that works to hold them. Beneath that shelving is a second workbench. Continuing down the wall, we come to an Victor Bearing cabinet. It also came out of one of my dad's service stations. In here are more drill bits, saw blades etc.
[img]https://www.allaboutpocketknives.c ... .jpg[/img]
Then we come to a 2' x 4' steel storage shelf. This catches a lot of junk, but in the middle you see a shelf full of plastic totes. In these totes are stored much of the wood I use. One tote is full of ebony, another full of desert ironwood and the others are full of assorted woods. I stock woods like Bokote, snake wood, Macassar ebony, Pau Rosa, Amboyna burl, African Blackwood, Bubinga, Cocobolo from both Mexico and Panama, Cocuswood, Jatoba (a.k.a. Brazilian Cherry), Kingwood, lace wood, Lignum Vitae, Madrone burl, Mesquite (thank you Johnnie), oak, Osage Orange, Pernambuco, Purple Heart, various types of Rosewood, Thuya Burl, Tulipwood, walnut, Wenge, zebra wood and a variety of stabilized wood blocks and scales.
[img]https://www.allaboutpocketknives.c ... .jpg[/img]
Re: Shops, tools, materials and tips
Posted: Sat Jan 10, 2009 5:09 pm
by orvet
[img]https://www.allaboutpocketknives.c ... .jpg[/img]
This is looking back toward the garage door, the southwest corner of my shop. As you can tell it is a bit cluttered.
Here is a close-up of something in the previous picture. This is where I store my sheets of sandpaper that I buy as loose sheets. In order to keep them from curling due to moisture they need to lay flat. My wife was going to throw this box away. Originally it contained a series of wooden puzzles, grandkids toys. Over the years enough pieces had been lost that my wife pitched them all. I rescued the box for sandpaper storage.
[img]https://www.allaboutpocketknives.c ... .jpg[/img]
This picture is looking towards the west wall. Part of an old computer desk provides storage and a place to set my 12-inch disc sander, which I rarely use. In front of the disc sander is a stand with my wet grinder.
[img]https://www.allaboutpocketknives.c ... .jpg[/img]
Next we have the table where I have my drill press and sanders. There is an empty space in the middle where the 12-inch disc sander sat. I am awaiting delivery of my new 2 x 36" belts sander. You can see my dust evacuation system (shop vac) in position ready for use. In the bottom right-hand portion of this picture you see a most important tool: the mini fridge! Sanding wood, antler & bone and knife making in general can be thirsty work. I keep a good supply of cold soda on hand!
[img]https://www.allaboutpocketknives.c ... .jpg[/img]
Also on the drill press table as my rack for holding sanding drums.
[img]https://www.allaboutpocketknives.c ... .jpg[/img]
Re: Shops, tools, materials and tips
Posted: Sat Jan 10, 2009 5:10 pm
by orvet
Here is a picture of my center project table. It is set up at the moment for etching.
[img]http://i35.photobucket.com/albums/ ... .jpg[/img]
Here is my big buffer that sets next to the end of the project table. Note the plastic dog fence in the picture. That is so I can keep the dogs out from underfoot when I need to, or if my son is working with me in the shop. Two guys (and I ain't small) and four dogs are too many in my small shop.
Here's a rack I built for the end of the project table. This holds some of the buffs and Scotch Bright wheels I used the most. It's handy to have them as close to the buffer.
[img]https://www.allaboutpocketknives.c ... .jpg[/img]
I love pegboard! Here is where I store most of my clamps that I use on a regular basis.
[img]https://www.allaboutpocketknives.c ... .jpg[/img]
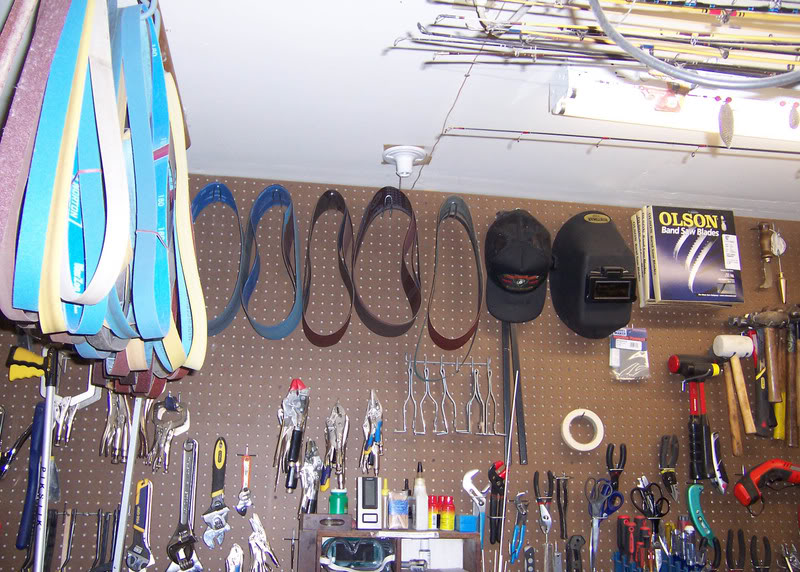
Storage is always a problem in a small area. The nice thing about sanding belts is you can hang them up. Here are some shots of overhead storage. You can't tell I like to fish can you?
[img]https://www.allaboutpocketknives.c ... .jpg[/img]
Of course no shop is complete without a mascot......... I have four. Here are three of our four Lhasa Apsos. They sleep underneath my sander/drill press table during the day. At night they like to sleep on our bed. Don't sell these guys short they are great guard dogs! The two biggest ones are about 35 pounds each. They don't like our next-door neighbor. They have bitten him twice and another neighbor once. Lhasa Apsos were bred to be internal palace and temple guard dogs in ancient Tibet. The breed goes back 2000 years or more.
[img]https://www.allaboutpocketknives.c ... .jpg[/img]
Well, I hope you enjoyed your little tour of my shop. Stop in and visit sometime when you're in Oregon! I promise, I'll put the dogs out so you don't get bitten. If they like you they won't bite you. If they like you, these dogs can't hold their licker.
Dale
Re: Shops, tools, materials and tips
Posted: Sat Jan 10, 2009 5:25 pm
by Brent
Nice shop pics. looks homy with lots of stuff to make stuff. thanks for the tour. brent
Re: Shops, tools, materials and tips
Posted: Sat Jan 10, 2009 6:27 pm
by justold52
Orvet thank you very much for taking the time to show us your shop. You sure do like a clean one. The only dust you have is on your drill press and shop vac. Do you dust with Pledge?..

2 things have me puzzled.
What are the 4 mountain due bottles close to the ceiling for?
Where is your air compressor? I see in some of your photos air hoses but no compressor. Is it in the other room due to the noise or in the attack ????
Re: Shops, tools, materials and tips
Posted: Sat Jan 10, 2009 7:00 pm
by orvet
justold52 wrote:Orvet thank you very much for taking the time to show us your shop. You sure do like a clean one. The only dust you have is on your drill press and shop vac. Do you dust with Pledge?..
2 things have me puzzled.
What are the 4 mountain due bottles close to the ceiling for?
Where is your air compressor? I see in some of your photos air hoses but no compressor. Is it in the other room due to the noise or in the attack ????
Thank you Ken. Glad you enjoyed the pics.
I did clean my shop before taking the pics. It took me a week to clean, reorganize & rearrange the shop.
I did use pledge on the table top, just to put some moisture in the wood. Good eye. There is plenty of dust left.
The Diet Dew bottles? Well, I drink so much of it that I have to have some where to put them.
Actually I put those up there to put 1 x 42" sanding belts on. If you use a nail sometimes the belt will break.
The compressor?
[img]https://www.allaboutpocketknives.c ... .jpg[/img]
You can see the tank behind the guard dawgs.
I do like to keep a clean shop,it just doesn't stay that way longer than about 5 minutes after I start working!
Dale
Re: Shops, tools, materials and tips
Posted: Sat Jan 10, 2009 8:31 pm
by justold52
I could not make out the motor on it. I thought it was just an air compress tank.
I thought you may have picked up on my idea too.
If you place your small air compresser in the atic and pipe down the air. It makes for a lot less noise in the shop and more ROOM to put things. Like I said just my idea...

Re: Shops, tools, materials and tips
Posted: Tue Jan 13, 2009 12:56 am
by W5RWU
Hey dale is that my CQB1 on on your bench ?
Shop looks real good, can you come over and help me with mine?
Randy
Re: Shops, tools, materials and tips
Posted: Tue Jan 13, 2009 5:02 am
by orvet
Randy,
You got yours.
That one is going to my daughter in the Army.

Dale
Re: Shops, tools, materials and tips
Posted: Mon Jan 26, 2009 1:32 am
by justold52
Hello Dale;
Did you like or even think about putting your air compressor up in the loft..? Some make so much noise the put them out side when useing them.
Re: Shops, tools, materials and tips
Posted: Mon Jan 26, 2009 4:00 am
by orvet
I don't have much loft left.
Mine doesn't run very much.
Dale
Re: Shops, tools, materials and tips
Posted: Mon Jan 26, 2009 5:51 am
by gmusic
Nice shop Dale!
Man, I thought I was organized.................look at that place.
MM......so that is where the magic happens.
Re: Shops, tools, materials and tips
Posted: Mon Jan 26, 2009 8:38 am
by orvet
Thanks Gary.
It stays that organized too, well about 5 minutes into the next project that is!
Dale
Re: Shops, tools, materials and tips
Posted: Sun May 10, 2009 1:08 pm
by orvet
Well, I finally got a real knife grinder.
It is a Grizzly 2 x 72 belt sander.
It really is nice. The slower belt allows me to do more than with my smaller, faster belt sanders. Also there is more variety in the belts available for the 2 x 72.
With a lot of practice I hope to be grinding my own blades before too long.
Dale
Re: Shops, tools, materials and tips
Posted: Sun May 10, 2009 2:23 pm
by muskrat man
Dale, how do you like the grizzly? I have been on the fence about buying one for a couple years now have heard both good and bad things about them. would be interested in your opinion of the machine
Re: Shops, tools, materials and tips
Posted: Sun May 10, 2009 2:46 pm
by DocRon
Dale,
It really looks nice. Thanks for posting the photos. Now, instead of being referred to as the ORVET Grinder, we can say that "ol' vet grinder". Sorry, couldn't resist.

Ron
Re: Shops, tools, materials and tips
Posted: Tue May 12, 2009 10:00 pm
by knifemaker3
Dale,
You'll like the Griz. I've had one for longer than I care to admit. All in all not a bad machine, IF you get to practice with it. I hope to someday be able to buy a much better grinder like a KMG, Bader, or Burr King. But, I've made many knives with my grizzly. The fixed blade I made in the tutorial I done was made on the Griz.
Many people hate them. Especially the Big named makers. But, they are a very good machine for the price. Yes the KMG, Bader, etc. are a much better quality grinder. But, fantastic work can also be done on the Griz as long as you learn how it grinds.
It's kinda like driving a car. A Caddy will get you from point A to point B. So will a yugo (remember them?). It's all in learning how to drive what you have to the best of it's ability. It will still get the job done, just maybe not with all the bells and whistles of the Big Named Grinders.
Have fun learning to grind on your new baby!

Re: Shops, tools, materials and tips
Posted: Wed May 13, 2009 2:36 am
by Owd Wullie
Hard to beat a 2x72 in my opinion.
Looks like a nice set up. One thing I wonder about is the size of the main wheel on the belt side. Looks a bit small for hollow grinding bigger blades. I say that because my home made 2x72 is running a 10" diameter drive wheel. That also gives a bit more room to grind from both directions on the big wheel. Left to right or right to left. Not a big deal on short blades, but if somebody wants you to build them a half sword or some such silliness. ( don't ask me how I know about things like that..


) It might get dicey.
I only made one flat ground blade and swore it would be a long time before I made another because of belt speed issues on my rig.
I'm going to put a new DC motor and controller on mine pretty soon. That way I can quit worrying about changing the darn drive belt to change the speed.
Those things will make a pile of metal or wood dust in the floor.

Oh, a 60 grit belt will remove the end off the glove and your fingerprints quicker than a cat can lick it's bottom.
I forgot to tell you and you've probably already figured this out, get a "slack tub" ( bucket/can/container ) of water close by. Your gonna get some stuff H-O-T!

Re: Shops, tools, materials and tips
Posted: Fri May 29, 2009 5:10 pm
by MrBlister
Heres some equip i acquired for lil bit of nuttin... Mite be the beginnings of a knife shop..Is this some of the stuff it takes to restore blade lustre?? plse advise
Foot controlled dental drill thingey..
Steam pressure machine..
Raggedy workbench..
Long shanked buffing motor..
Cluttered but roomy workshop..
NO GIRLS ALLOWED (Dennis the menace style) sign for door
Shop fridge for adult beverages..
Re: Shops, tools, materials and tips
Posted: Fri May 29, 2009 7:05 pm
by orvet
The Buffer & Foredom (Foot controlled dental drill thingey) are a great start.
Steam cleaner might come in handy once in a while.
The Fridge is a necessity! Mine is full of Diet Mt Dew.
You might be able to improve the work bench with some bracing.
Where is your shop dog? That is a requirement!!! I have 4 of them, but only 3 are in the pic.
Dale
Re: Shops, tools, materials and tips
Posted: Sat Aug 01, 2009 2:55 pm
by ronjeez
Owd Wullie wrote:Hard to beat a 2x72 in my opinion.
Looks like a nice set up. One thing I wonder about is the size of the main wheel on the belt side. Looks a bit small for hollow grinding bigger blades. I say that because my home made 2x72 is running a 10" diameter drive wheel. That also gives a bit more room to grind from both directions on the big wheel. Left to right or right to left. Not a big deal on short blades, but if somebody wants you to build them a half sword or some such silliness. ( don't ask me how I know about things like that..
) It might get dicey.
I only made one flat ground blade and swore it would be a long time before I made another because of belt speed issues on my rig.
I'm going to put a new DC motor and controller on mine pretty soon. That way I can quit worrying about changing the darn drive belt to change the speed.
Those things will make a pile of metal or wood dust in the floor.
Oh, a 60 grit belt will remove the end off the glove and your fingerprints quicker than a cat can lick it's bottom.
I forgot to tell you and you've probably already figured this out, get a "slack tub" ( bucket/can/container ) of water close by. Your gonna get some stuff H-O-T!
yes this is it, thanks for the help im actually looking for this one
_________________
Swords
![[img]https://www.allaboutpocketknives.c ... .jpg[/img]](%5Bimg%5Dhttps%3A//www.allaboutpocketknives.com/images/forum_archives/d178-orvet-Northwall.jpg%5B/img%5D)
![[img]https://www.allaboutpocketknives.c ... .jpg[/img]](%5Bimg%5Dhttps%3A//www.allaboutpocketknives.com/images/forum_archives/d178-orvet-NECornerBench.jpg%5B/img%5D)
![[img]https://www.allaboutpocketknives.c ... .jpg[/img]](%5Bimg%5Dhttps%3A//www.allaboutpocketknives.com/images/forum_archives/d178-orvet-EastBenchWall.jpg%5B/img%5D)
![[img]https://www.allaboutpocketknives.c ... .jpg[/img]](%5Bimg%5Dhttps%3A//www.allaboutpocketknives.com/images/forum_archives/d178-orvet-SEcornerStorage.jpg%5B/img%5D)
![[img]https://www.allaboutpocketknives.c ... .jpg[/img]](%5Bimg%5Dhttps%3A//www.allaboutpocketknives.com/images/forum_archives/d178-orvet-lookingbackatSWcorner.jpg%5B/img%5D)
![[img]https://www.allaboutpocketknives.c ... .jpg[/img]](%5Bimg%5Dhttps%3A//www.allaboutpocketknives.com/images/forum_archives/d178-orvet-Sandpaperstorage.jpg%5B/img%5D)
![[img]https://www.allaboutpocketknives.c ... .jpg[/img]](%5Bimg%5Dhttps%3A//www.allaboutpocketknives.com/images/forum_archives/d178-orvet-LookingatWestWall.jpg%5B/img%5D)
![[img]https://www.allaboutpocketknives.c ... .jpg[/img]](%5Bimg%5Dhttps%3A//www.allaboutpocketknives.com/images/forum_archives/d178-orvet-SanderDrillPresstable.jpg%5B/img%5D)
![[img]https://www.allaboutpocketknives.c ... .jpg[/img]](%5Bimg%5Dhttps%3A//www.allaboutpocketknives.com/images/forum_archives/d178-orvet-SandingDrumRack.jpg%5B/img%5D)
![[img]http://i35.photobucket.com/albums/ ... .jpg[/img]](%5Bimg%5Dhttp%3A//i35.photobucket.com/albums/d178/orvet/CenterProjectTable.jpg%5B/img%5D)
![[img]https://www.allaboutpocketknives.c ... .jpg[/img]](%5Bimg%5Dhttps%3A//www.allaboutpocketknives.com/images/forum_archives/d178-orvet-BuffStorageonendofProjectTable.jpg%5B/img%5D)
![[img]https://www.allaboutpocketknives.c ... .jpg[/img]](%5Bimg%5Dhttps%3A//www.allaboutpocketknives.com/images/forum_archives/d178-orvet-Clampstorage.jpg%5B/img%5D)
![[img]https://www.allaboutpocketknives.c ... .jpg[/img]](%5Bimg%5Dhttps%3A//www.allaboutpocketknives.com/images/forum_archives/d178-orvet-overheadstorage.jpg%5B/img%5D)
![[img]https://www.allaboutpocketknives.c ... .jpg[/img]](%5Bimg%5Dhttps%3A//www.allaboutpocketknives.com/images/forum_archives/d178-orvet-BeneaththeSander-Drillpresstable.jpg%5B/img%5D)