
It's a pretty straightforward process after watching that video, now to make a holder and give it a try
Cool Old Tools
-
Miller Bro's
- Gold Tier

- Posts: 13631
- Joined: Mon Feb 16, 2009 11:22 pm
- Location: Earth
Re: Cool Old Tools
Thanks for the video Mike 
It's a pretty straightforward process after watching that video, now to make a holder and give it a try
It's a pretty straightforward process after watching that video, now to make a holder and give it a try
AAPK Janitor
369
369
-
Unk

- Gold Tier
- Posts: 2392
- Joined: Mon Jul 28, 2008 4:00 am
- Location: The Lone Star State
Re: Cool Old Tools
Yep, it's not difficult. Pretty relaxing to do, I think, as you have to focus on skipping each tooth. Only took me about 20 minutes or so, and I was taking my time.Miller Bro's wrote: ↑Tue Mar 11, 2025 11:19 am Thanks for the video Mike
It's a pretty straightforward process after watching that video, now to make a holder and give it a try
I picked up this old Clipper Tool Co. "Neverbreak" saw vise and an old Morrill saw set at estate sales over the last couple of years. They both still work great.
- Attachments
-
-
-
-
-
- Clipper Tool Co ad from 1916
-
- Morrill ad from 1899
Mike
If you don't watch the news, you are uninformed. If you watch the news, you are misinformed.
If you don't watch the news, you are uninformed. If you watch the news, you are misinformed.
-
OLDE CUTLER

- Gold Tier
- Posts: 5675
- Joined: Wed Oct 11, 2017 8:11 pm
- Location: South Dakota
Re: Cool Old Tools
One time years ago I was at a garage sale and a woman who was selling her late husbands things had a saw vise similar to that shown above. I picked it up and was looking at it when she asked me if I knew what it was. I told her it was a vise for holding handsaws for sharpening and she just stood there with her mouth open. "Oh, she said, I have been using it clamped onto my table to hold my recipe cards when I am baking."
"Sometimes even the blind chicken finds corn"
-
doglegg
- Gold Tier
- Posts: 23955
- Joined: Mon Sep 18, 2017 2:35 am
- Location: Grand Prairie, Texas
Re: Cool Old Tools
OLDE CUTLER wrote: ↑Fri Mar 14, 2025 9:17 pm One time years ago I was at a garage sale and a woman who was selling her late husbands things had a saw vise similar to that shown above. I picked it up and was looking at it when she asked me if I knew what it was. I told her it was a vise for holding handsaws for sharpening and she just stood there with her mouth open. "Oh, she said, I have been using it clamped onto my table to hold my recipe cards when I am baking."
-
Unk
- Gold Tier
- Posts: 2392
- Joined: Mon Jul 28, 2008 4:00 am
- Location: The Lone Star State
Re: Cool Old Tools
OC, I thought mine was a small sheet metal brake when I picked it up at the estate sale. I thought that might be handy, so I bought it ( a couple of bucks, IIR). It wasn't until I got home and researched the name that I found out it was a saw vise. That made me happy, as I think I will use a saw vise more than a sheet metal brake.OLDE CUTLER wrote: ↑Fri Mar 14, 2025 9:17 pm One time years ago I was at a garage sale and a woman who was selling her late husbands things had a saw vise similar to that shown above. I picked it up and was looking at it when she asked me if I knew what it was. I told her it was a vise for holding handsaws for sharpening and she just stood there with her mouth open. "Oh, she said, I have been using it clamped onto my table to hold my recipe cards when I am baking."
Mike
If you don't watch the news, you are uninformed. If you watch the news, you are misinformed.
If you don't watch the news, you are uninformed. If you watch the news, you are misinformed.
-
GSPTOPDOG

- Posts: 9133
- Joined: Sat Jun 22, 2019 10:03 pm
- Contact:
Re: Cool Old Tools
Unk wrote: ↑Wed Mar 12, 2025 4:09 amYep, it's not difficult. Pretty relaxing to do, I think, as you have to focus on skipping each tooth. Only took me about 20 minutes or so, and I was taking my time.Miller Bro's wrote: ↑Tue Mar 11, 2025 11:19 am Thanks for the video Mike
It's a pretty straightforward process after watching that video, now to make a holder and give it a try
I picked up this old Clipper Tool Co. "Neverbreak" saw vise and an old Morrill saw set at estate sales over the last couple of years. They both still work great.
Please visit my AAPK store: https://www.allaboutpocketknives.com/ca ... er_id=2383
They say, “Hard work never hurt anyone”, but I'm still not willing to risk it.
They say, “Hard work never hurt anyone”, but I'm still not willing to risk it.
-
Unk
- Gold Tier
- Posts: 2392
- Joined: Mon Jul 28, 2008 4:00 am
- Location: The Lone Star State
Re: Cool Old Tools
Mike
If you don't watch the news, you are uninformed. If you watch the news, you are misinformed.
If you don't watch the news, you are uninformed. If you watch the news, you are misinformed.
-
GSPTOPDOG
- Posts: 9133
- Joined: Sat Jun 22, 2019 10:03 pm
- Contact:
Re: Cool Old Tools
I started using this old ball-peen hammer the other day. I had not paid attention to the maker's mark because when I got it, the hammer was completely cover in heavy rust. I had put it away after cleaning the rust off of it then soaking it in oil and never saw the maker's mark before it away and all of a sudden,  ... I noticed that it was made in England
  ... I reckon' that makes it a keeper....
- Attachments
-
-
-
Please visit my AAPK store: https://www.allaboutpocketknives.com/ca ... er_id=2383
They say, “Hard work never hurt anyone”, but I'm still not willing to risk it.
They say, “Hard work never hurt anyone”, but I'm still not willing to risk it.
-
Waukonda
- Gold Tier
- Posts: 6361
- Joined: Sat Aug 31, 2019 1:35 am
-
Unk
- Gold Tier
- Posts: 2392
- Joined: Mon Jul 28, 2008 4:00 am
- Location: The Lone Star State
Re: Cool Old Tools
Nice, TD!
Mike
If you don't watch the news, you are uninformed. If you watch the news, you are misinformed.
If you don't watch the news, you are uninformed. If you watch the news, you are misinformed.
-
Unk
- Gold Tier
- Posts: 2392
- Joined: Mon Jul 28, 2008 4:00 am
- Location: The Lone Star State
Re: Cool Old Tools
Latest estate sale finds.
A Craftsman "Flying V" 1/4 ratchet set. The flying V selector ratchets were made 1959 to 1966. Complete except missing the 6" extension.
A Lufkin 100 ft steel rule.
A large can of 3 in 1 oil - it's about 3/4 full (I like these old metal cans).
A complete set of Craftsman Professional quick connect drill bits (made in the USA).
- Attachments
-
-
-
-
Mike
If you don't watch the news, you are uninformed. If you watch the news, you are misinformed.
If you don't watch the news, you are uninformed. If you watch the news, you are misinformed.
-
GSPTOPDOG
- Posts: 9133
- Joined: Sat Jun 22, 2019 10:03 pm
- Contact:
Re: Cool Old Tools
Great finds Unk!!Unk wrote: ↑Thu Apr 24, 2025 5:21 pm Latest estate sale finds.
A Craftsman "Flying V" 1/4 ratchet set. The flying V selector ratchets were made 1959 to 1966. Complete except missing the 6" extension.
A Lufkin 100 ft steel rule.
A large can of 3 in 1 oil - it's about 3/4 full (I like these old metal cans).
A complete set of Craftsman Professional quick connect drill bits (made in the USA).
I've been using these tools lately for some 'lill projects I've been trying to finish up. I love tools from Sweden!!!


- Attachments
-
-
-
-
-
-
-
-
Please visit my AAPK store: https://www.allaboutpocketknives.com/ca ... er_id=2383
They say, “Hard work never hurt anyone”, but I'm still not willing to risk it.
They say, “Hard work never hurt anyone”, but I'm still not willing to risk it.
-
just bob

- Posts: 2835
- Joined: Mon Apr 25, 2011 7:05 pm
Re: Cool Old Tools
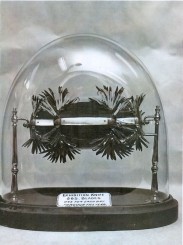
Never saw one of these before. There are several on-line listed as antiques. Early Kent Knife Sharpener. I also found the instructions.
How to Use a Kent's Rotary Knife Cleaner:
Insert Knives: Insert the knives into the slots on the top of the wooden drum.
Add Abrasive Powder: Pour Kent's emery powder (or similar abrasive cleaner) into the drum's chute.
Turn the Handle: Crank the hand crank to rotate the discs inside the machine.
Discs and Bristles: Inside the drum, wooden discs covered with bristles and leather strips would turn and rub against both sides of the knives.
Polishing Action: The emery powder would polish the steel cutlery as it passed through the rotating discs.
- Attachments
-
“The world is changed by your example, not by your opinion.” (Paulo Coelho)
Men make plans and God laughs
Better to remain silent and be thought a fool than to speak and to remove all doubt.
Men make plans and God laughs
Better to remain silent and be thought a fool than to speak and to remove all doubt.
-
doglegg
- Gold Tier
- Posts: 23955
- Joined: Mon Sep 18, 2017 2:35 am
- Location: Grand Prairie, Texas
Re: Cool Old Tools
Amazing!just bob wrote: ↑Fri Jun 20, 2025 12:05 pm Never saw one of these before. There are several on-line listed as antiques. Early Kent Knife Sharpener. I also found the instructions.
How to Use a Kent's Rotary Knife Cleaner:
Insert Knives: Insert the knives into the slots on the top of the wooden drum.
Add Abrasive Powder: Pour Kent's emery powder (or similar abrasive cleaner) into the drum's chute.
Turn the Handle: Crank the hand crank to rotate the discs inside the machine.
Discs and Bristles: Inside the drum, wooden discs covered with bristles and leather strips would turn and rub against both sides of the knives.
Polishing Action: The emery powder would polish the steel cutlery as it passed through the rotating discs.
-
DM11
- Gold Tier
- Posts: 9130
- Joined: Tue Feb 21, 2017 4:46 am
- Location: Kansas
-
DM11
- Gold Tier
- Posts: 9130
- Joined: Tue Feb 21, 2017 4:46 am
- Location: Kansas
-
doglegg
- Gold Tier
- Posts: 23955
- Joined: Mon Sep 18, 2017 2:35 am
- Location: Grand Prairie, Texas
-
Unk
- Gold Tier
- Posts: 2392
- Joined: Mon Jul 28, 2008 4:00 am
- Location: The Lone Star State
Re: Cool Old Tools
Newest addition to the shop. I found this sander on Facebook MP for a decent deal. It's called a Delta Sanding Center model 31-280. It has a 6x48 belt and a 12 inch disc. As near as I can tell these were made from the early 1990s until after 2000. Mine was made in the USA in Feb 1998. Weighs around 200 lbs so nice and heavy.
- Attachments
-
-
-
Mike
If you don't watch the news, you are uninformed. If you watch the news, you are misinformed.
If you don't watch the news, you are uninformed. If you watch the news, you are misinformed.
-
GSPTOPDOG
- Posts: 9133
- Joined: Sat Jun 22, 2019 10:03 pm
- Contact:
Re: Cool Old Tools
Unk wrote: ↑Tue Aug 12, 2025 2:53 am Newest addition to the shop. I found this sander on Facebook MP for a decent deal. It's called a Delta Sanding Center model 31-280. It has a 6x48 belt and a 12 inch disc. As near as I can tell these were made from the early 1990s until after 2000. Mine was made in the USA in Feb 1998. Weighs around 200 lbs so nice and heavy.
 Score!!!!

Please visit my AAPK store: https://www.allaboutpocketknives.com/ca ... er_id=2383
They say, “Hard work never hurt anyone”, but I'm still not willing to risk it.
They say, “Hard work never hurt anyone”, but I'm still not willing to risk it.
-
FRJ

- Gold Tier
- Posts: 17140
- Joined: Fri May 14, 2010 1:43 pm
- Location: Ct.
-
Unk
- Gold Tier
- Posts: 2392
- Joined: Mon Jul 28, 2008 4:00 am
- Location: The Lone Star State
Re: Cool Old Tools
Thanks guys. I've had good luck with Delta / Rockwell stuff - Lathe, Miter Saw, Table Saw, Band Saw, Planer, Bench Grinder, and now a sander. I've been looking for a nice floor sander for a couple of years, used but in decent shape. Nice to finally find one in my price range. I have relied on my little 4x36 benchtop sander (Tradesman Brand) for around the last 30 years or so, and it's getting long in the tooth. I also have a little no-name 1x30 sander my dad bought at a garage sale for $1. I did a little refurb on it and got it running good and have used it for the last 20 years or so. They both sit at the end of my workbench on a stand I made from an old Singer sewing machine treadle base.
Now for the hard part - to find a place for the new sander.
Now for the hard part - to find a place for the new sander.
- Attachments
-
Mike
If you don't watch the news, you are uninformed. If you watch the news, you are misinformed.
If you don't watch the news, you are uninformed. If you watch the news, you are misinformed.
-
Mumbleypeg

- Gold Tier
- Posts: 15707
- Joined: Fri Apr 18, 2014 1:28 am
- Location: Republic of Texas
Re: Cool Old Tools
Nice find Mike! Most of my tools are old too. In fact even older than me.
Here’s one of my most useful but overlooked tools. I found this one, complete with original packaging, after giving the ones I had to my sons. Most folks nowadays want a power drill so these are out of fashion, but when I have a small job needing just a couple of holes drilled in wood or plastic I grab this handy “Yankee drill”. Not sure how old this one is, but they’ve been around for a long time. My dad had a similar one when I was a kid. Due to the safety warnings and the zip code on the packaging for this one I suspect it’s one of the newer ones.
Ken
- Attachments
-
Member AKTI, TSRA, NRA.
If your religion requires that you hate someone, you need a new religion.
When the people fear their government, that is tyranny. When government fears the people, that is freedom.
https://www.akti.org/
If your religion requires that you hate someone, you need a new religion.
When the people fear their government, that is tyranny. When government fears the people, that is freedom.
https://www.akti.org/
-
Unk
- Gold Tier
- Posts: 2392
- Joined: Mon Jul 28, 2008 4:00 am
- Location: The Lone Star State
Re: Cool Old Tools
That's a nice one, Ken - Craftsman - and made in the USA. My only push drill is a North Brothers "Yankee" I picked at an estate sale a couple of years ago. I think it is from the 1940s or 50s. I have never used it as it didn't have any bits left in the handle. I priced bit sets, but they are a bit pricey.Mumbleypeg wrote: ↑Thu Aug 14, 2025 6:37 pm Nice find Mike! Most of my tools are old too. In fact even older than me.
Here’s one of my most useful but overlooked tools. I found this one, complete with original packaging, after giving the ones I had to my sons. Most folks nowadays want a power drill so these are out of fashion, but when I have a small job needing just a couple of holes drilled in wood or plastic I grab this handy “Yankee drill”. Not sure how old this one is, but they’ve been around for a long time. My dad had a similar one when I was a kid. Due to the safety warnings and the zip code on the packaging for this one I suspect it’s one of the newer ones.
Ken
Mike
If you don't watch the news, you are uninformed. If you watch the news, you are misinformed.
If you don't watch the news, you are uninformed. If you watch the news, you are misinformed.
-
Mumbleypeg
- Gold Tier
- Posts: 15707
- Joined: Fri Apr 18, 2014 1:28 am
- Location: Republic of Texas
Re: Cool Old Tools
Thanks.Unk wrote: ↑Fri Aug 15, 2025 2:36 am
That's a nice one, Ken - Craftsman - and made in the USA. My only push drill is a North Brothers "Yankee" I picked at an estate sale a couple of years ago. I think it is from the 1940s or 50s. I have never used it as it didn't have any bits left in the handle. I priced bit sets, but they are a bit pricey.
All the “Yankee” drills I’ve seen use the same bits whether they’re the all metal versions or the ones with plastic housing. I think the Craftsman versions were made by Stanley and before that Miller Falls. Weird but you can sometimes find a drill with bits on eBay for less than $20, and cheaper than just the bits alone.
Ken
Member AKTI, TSRA, NRA.
If your religion requires that you hate someone, you need a new religion.
When the people fear their government, that is tyranny. When government fears the people, that is freedom.
https://www.akti.org/
If your religion requires that you hate someone, you need a new religion.
When the people fear their government, that is tyranny. When government fears the people, that is freedom.
https://www.akti.org/
-
Unk
- Gold Tier
- Posts: 2392
- Joined: Mon Jul 28, 2008 4:00 am
- Location: The Lone Star State
Re: Cool Old Tools
My new / old sander was missing the back cover, which was originally made of sheet metal. I decided to make one out of some thin plywood I had left over from another project. I decided it needed it partly for safety, partly because I thought it might improve the dust collection when I had my vacuum hooked up to it. I held the plywood up against the back, traced the outline with a pencil, and cut it out on the bandsaw. Initially I left it straight across the bottom, but then realized I couldn't lay the sander down into the horizontal position unless it followed the angle at the bottom (as the original sheet metal back cover did.) So I measured a few angles, did a little more cutting, sanding, and gluing, and replicated the original back cover shape. I had a little smoke gray paint left over from restoring my lathe a couple of years ago, which matched close enough. The vacuum now works great on the belt side - virtually no dust flying around in the shop (and up my nose and in my eyes). It doesn't work as well on the disc side, but still much better than before.
- Attachments
-
- Made from plywood
-
- Original design - straight at the bottom
-
- Improved design - Angle added to the bottom
-
- Close up of angle
-
- Finished - calling it good enough
Mike
If you don't watch the news, you are uninformed. If you watch the news, you are misinformed.
If you don't watch the news, you are uninformed. If you watch the news, you are misinformed.