jerryd6818 wrote:Well the mark is United Shoe Machinery Corporation. The tool has been shown on AAPK before and I don't think anyone ever came up with it's purpose.
glennbad, That is a cool chest! I even see an old meat cleaver in there among all the goodies. Do you suppose that top could be used similar to a miter box, or a least for marking 45 degree angles?
Jerry, I surprised at you! USMC, United Shoe Machinery Corporation? That's almost sacrilege! Treefarmer
A GUN IN THE HAND IS BETTER THAN A COP ON THE PHONE.
The last open drawer photo shows several wall ties. They are the coregated looking metal strips with a couple of small holes in them. They are used to connect a brick veneer wall to the frame structure. You nail one end of the metal strip to a stud then bend it so that half of the strip is laying in the bed joint (horizontal mortar joint) of the brick. After that the mortar is spread and another course of brick is layed on top of the strip.
That may be a clue that the previous owner of the box did some building construction work.
I suspect (but do not know) that the serrated blade tool in question may have been used to cut drywall or perhaps cellotex boards.
Glenn that's a cool box for sure. Are you planning to give it the spa treatment ?
philco wrote:The last open drawer photo shows several wall ties. They are the coregated looking metal strips with a couple of small holes in them. They are used to connect a brick veneer wall to the frame structure. You nail one end of the metal strip to a stud then bend it so that half of the strip is laying in the bed joint (horizontal mortar joint) of the brick. After that the mortar is spread and another course of brick is layed on top of the strip.
That may be a clue that the previous owner of the box did some building construction work.
I suspect (but do not know) that the serrated blade tool in question may have been used to cut drywall or perhaps cellotex boards.
Glenn that's a cool box for sure. Are you planning to give it the spa treatment ?
I definitely want to spiffy it up some. I don't think I will be hurting the value. I would like to get some of the paint splatters off, and fix some of the wood issues. Any suggestions what I could use on the paint?
philco wrote:
I suspect (but do not know) that the serrated blade tool in question may have been used to cut drywall or perhaps cellotex boards.
Glenn that's a cool box for sure. Are you planning to give it the spa treatment ?
I definitely want to spiffy it up some. I don't think I will be hurting the value. I would like to get some of the paint splatters off, and fix some of the wood issues. Any suggestions what I could use on the paint?
Glenn
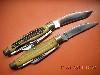
Phil:I have a couple of those USMC knives and I believe the end was used for removing nails in shoe soles and the serrated part of the blade used to spread glue on the soles before attaching them to the shoe itself.The grooves in the glue help it to adhere better.
Glenn:I would do nothing to the box except give it a good cleaning with some Murphy's Oil Soap and do whatever repairs are needed.The paint can sometimes be removed by CAREFULLY scraping with a single edged razor blade;being careful not to cut into the wood.After scraping'treat the bare wood with some furniture oil.If you need to stain it.try rubbing some old coffee grounds on the bare areas and leaving them for a bit before removing.Makes a nice wood stain for touch up work.
I just picked up a nearly 100 year old mechanic's tool box that I am in the process of cleaning up.Will post some pics when it is finished.
chetr1200c wrote:i like the mitre suggestion for the top design. but my first impression is that it might be the mating disign for a stackable twin box.
That's an interesting theory. You might be on to something there.
I was thinking abou the Murphy's oil soap as well. I'm going to do as little to it as needed.
Citri-strip, an orange-oil based paint remover, is highly spoken of in the tool collecting fraternity for the removal of paint spatter, etc.
The design of the top looks to me like one of the many attempts to make a faux raised-panel top. Instead of doing an actual raised panel, folks would make the top of one board (or multiple boards) and "apply" a piece to sort of look like a fielded or raised panel in a frame.
coffeecup wrote:The design of the top looks to me like one of the many attempts to make a faux raised-panel top. Instead of doing an actual raised panel, folks would make the top of one board (or multiple boards) and "apply" a piece to sort of look like a fielded or raised panel in a frame.
Jim, that's what I said earlier. It looks like it's for decoration. You would have to put a gauge on it to make sure but I don't think the angles are right for a mitre gauge. Besides if it were for that it would have been used and if it had been used there would be saw marks on the top. No one is careful enough to avoid that.
Reminds me of the diamond shaped mirror inside the top of a Gerstner tool box. A little stretched out but close enough for government work.
Forged on the anvil of discipline.
The Few. The Proud.
Jerry D.
This country has become more about sub-groups than about it's unity as a nation.
"The #72 pattern has got to be pretty close to the perfect knife."
--T.J. Murphy 2012
Jerry, I was too tired last night to finish up my thoughts and kind of left that comment hanging, didn't I? I tend to forget that most folks are more interested in how something looks and how it functions, while I'm off in lala-land trying to figure out how and when and where something was made, and why it was made that way. (And I wonder about weird stuff, like how to access the wells on either side of the drawer, or if the maker even intended that space to be used?)
Looking over my notes, the only panels I've seen like that seemed to have been acquired at the Brimfield flea market, suggesting an east coast, or even MA origin. Construction details suggest it was made by a carpenter, or an amateur, probably in the first third of the twentieth century.
Quality should not be an accident. So what is the explanation for some of the knives we've seen in the past few years? (from A Knifebuyer's Manifesto)
coffeecup wrote:Jerry, I was too tired last night to finish up my thoughts and kind of left that comment hanging, didn't I? I tend to forget that most folks are more interested in how something looks and how it functions, while I'm off in lala-land trying to figure out how and when and where something was made, and why it was made that way. (And I wonder about weird stuff, like how to access the wells on either side of the drawer, or if the maker even intended that space to be used?)
Looking over my notes, the only panels I've seen like that seemed to have been acquired at the Brimfield flea market, suggesting an east coast, or even MA origin. Construction details suggest it was made by a carpenter, or an amateur, probably in the first third of the twentieth century.
I would agree that it looks home-made or carpenter made. It has some nice features, but not too flashy, and weighs a ton. I don't think it was designed to be moved alot. There appears to just be dead space on either side of the drawer.
Also, do you think there was originally only one removable compartment in the chest, or do you think the whole inside would have been covered with a second insert?
Like Jerry wrote, it is a very nice box. Someone probably made and used it as a bench-top box, but whoever made it, it looks to have received a fair amount of use over the years. The half-mortise chest lock was replaced with a hasp (someone probably lost the key, or the chest was sold without a key), and from the wear it saw some use with a padlock holding it closed.
Traditionally on larger boxes there would be one or two trays, leaving enough room to slide them to one side or the other to allow access to the contents without removing the trays. My guess would be that this one probably only had one tray as another would block access to the stuff underneath. Removing the tray risks spills, which are a real pain. Then again, there could have been a wide tray that was intended to be removed--look on the side of the current till for any signs of wear that don't match the inside sides of the chest.
the toolboxes that i made when i first started in the carpentry business were first assembled as a 12/14 inch deep wooden box, made of plywood, totally closed up and nailed, glued on all six sides. then sanded and all the corners and edges smoothed. they look kinda wierd at first if you didn't know what was happening next. just a wooden sealed rectangle box. then i put it on the table saw cutting 2 inches all around one side, either top or bottom, didn't matter at that point, therefore making a matching woodgrain when closed after the hinges and hasp were attached. then i would make a shelf slide 3 inches down for one tray with smaller compartments built into it and as wide as the box minus some room on the sides for a retainer chain when opened. one full tray is better than a half tray for more storage. can't forget the heavy duty handles on the sides.
i made a couple of these in different sizes for me and coworkers. i still have two. haven't looked in them in some time now. they just got to be too clunky for me to carry around, now i just use empty and cleaned spackling pails with those neat liners designed for all sorts of tool sizes. the poor boxes are just sitting in my barn under a bunch of other stuff. heck they probably are still filled with old tools and bits just like that one you got. lots of stories of jobs long ago forgotten.





 Treefarmer



 I would like to get some of the paint splatters off, and fix some of the wood issues. Any suggestions what I could use on the paint?