

About 4 weeks ago I got serious about attempting a repair on an old knife, just as I was going to get started I injured my wrist. I was in a cast for 3 weeks, so the project got put on the back burner again. One good thing about the down time was I had all this time while house bound to locate tools and study just how I was going to attack this project. After my hand was useable I started practicing the art of forming a head on a pin, no easy task without practice, so I got some scrap wood and a sheet of tin drilled a lot of holes and practiced for days 7-8 hours till I was satisfied with my results. I was now forming a head on a steel pin without bending it, nickle and brass was easy after learning on steel.
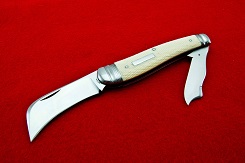
The knife was chosen, and old English single blade with a worn out blade, handles chipped off at the bottom pin on both sides, heavily pocket worn but it had some nice grooved bolsters! The liners and all the pins including the pivot pin was steel, I don`t like steel on nickle for a pivot pin so I decided to replace that pin with nickle.
My intention was to keep the knife as close to original looking as possible, including as much of the original patina. I decide there would be no gluing handles on here, I must do it the way it was done at the factory. The handles were English stag, I had an old slab for the front side and in keeping with English construction I wanted to put the more gnarly handle on the back side. I found an old kitchen knife handle and sliced off a piece. The original handles had a gap between the bolsters and stag so I left the gap when the new handles were cut. Next I needed to located a replacement knife blade, no problem there I found a great sheep foot blade in my parts bin. The length was just right and the tang thickness.
The previous owner made an E.O. notch so they could get the blade open, I decided to leave the notch and enlarge it as the old one was rather crude and not large enough. The handles were pinned on using steel rod, no easy task when you have uneven gnarly stag on one side! Note to others attempting this, do not use rough stag for your first project! The knife went together well and I did not break of crack either of the stag handles, I was quite satisfied the way the handles went on.
The next challenge was to pin the blade, again no easy task with grooved bolsters! I did not want to lose the patina on the bolsters so I taped them off while I worked on the one groove pinning the blade. I made my own shim out of a brass liner of a parts knife. The blade moved freely and snaps both ways, so no problem there.
All in all I was very happy with the results as It looks "original" without me erasing the patina and having to buff the bolsters. I learned a lot on this one and if I decide to do another one someday it should take less time and be easier for me. Lots of pictures below, hope you guys like it.


 Soooo.... when do your plans for the next one start???? Tomorrow?... Morning of noon?
 Congrats!
 )
)
 I know you've been on the trail to doin' this for along time and from what I see, you nailed it my friend!! Excellent job and I can't wait to see where you go from here!! I too would love to see your shop setup.