It's turned really chilly here, @5 above this morning and only in the teens right now. So, instead of warming up the shop to work out there today, I'm just doing what I can inside the house and making short trips out to the shop. So, there may not be very many pics, but I will explain what needs done.
I also forgot to mention that when sanding your bolsters to shape and before permenently attaching them, finish sand the front of the bolsters down to the grit you want. It's almost impossible to finish them once they are attached as you will really mesh up the finish on the blade. I sanded down to 400 grit. Brass buffs really easy and you can get a great mirror finish from 400 grit so I seldom ever take brass past this.
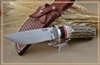
OK, now for today. Next, I take the knife out of the clamps, clip the pin material to where they are within an 1/8" from the bolster on both sides, and then pean the pins. I don't worry so much about chamfering the hole for the peaned pin as this is just to give added support to the jb welded bolsters. It may be overkill to pin with the jb weld but I don't want a knife coming back with a bolster knocked off either. So, this is the method I use. I also pin when soldering which makes a much stronger joint. If the knife is a heavy utility style or camp style blade that will be subjected to serious use, I will solder and pin to make as strong a joint as possible. NOTE: I only use the jb weld with pins method when using jb weld. I don't trust just the jb weld alone to hold the bolster. When soldering, you can just use solder and no pins, but I still pin just for added security.
Once that is done, I sand the pins flush and then prepare the handle material. In this case it will be stabilized black walnut. I sand the handle material flat on the bottom and also the front where the handle will meet the bolster. I check as I sand to make sure the handle material meets the handle and bolster with no gaps.
Then I lay out everything I need.
I dry fit and clamp everything together. Then lay it out to prepare for epoxying the handle on. I use Devcon 2 ton epoxy. I feel it holds a little better than the 5 minute stuff. Wipe all mating surfaces with acetone including the handle material, tang, and bolster. Mix epoxy per instructions, coat ALL surfaces and clamp.
TIP: I use disposable latex gloves when epoxying to keep the stuff off my hands. I hate cleaning epoxy off the hands!
I only glue 1 side at a time. I glue and clamp, let dry, and then drill all the holes in the knife handle. If it's not done this way you cannot find your holes to drill them out!

That's all for now. I have 1 side clamped and drying. After I have both sides done, I will start again with pin placement. Until then, have a good day!